Counter Installers, Plumbing and a Dry Wall Plan
Where do I begin LOL. It was so long ago.
The Counter Fitters (installers installment) came and the two guys walk into the kitchen and mumble little secret things to each other creating a plan of action. The head guy looks around and I see a big question mark appear above his head in a word balloon as he looks at one section where the back splash is right under some tile.
 He says - "OH OH" (never a good sign) and takes out his tape measure. He then says "I bet they didn't measure this right".
He comes back with the piece but nope! - does not fit. Never fear, he will grind the tile to the correct height.
Coming back with a sander he proceeds to fill the kitchen with white dust but all is good as it fits nice and snug.
The counters look pretty nice - not exactly the color I was expecting but I like the first look of them.
 They set up shop outside on the driveway and take the big countertop out to prepare for sink installation.
He comes in and asked about the faucet and this is where I make my first mistake (more on this later). I give him the faucet and he measures the width and so forth so he can drill holes into the Quartz. No problem . . . .so far.
We decided to buy a new sink that was undermounted as it looks much better then the old overmounted sink. If you are spending this much on a countertop, get a good sink.
 The sink is attached to the counter top and now the hard part (for them). Getting a 350 pound countertop into the house. The good part is it is MUCH easier then Granite which is not as sturdy.
It was a pretty good size struggle and I waited to take the photo as I did not want them to be blinded or surprised. What you see LOOKS like they are just flipping it in, it was not the case.
After getting the countertop on top of the counters it's smooth sailing from there. They put on the back splashes, do the caulking and it's all good.
They inform me about some counter problems with slumping and so forth but it is not very often that we have guest's laying on the floor so nobody but you readers will know that part of our counter has dropped 1/2 in the last 30 years! Shhhhh!
 Now it's time for me to go to work with the plumbing.
Let me say this right from the beginning - I have never been a plumber, have never played a plumber on TV, have never WANTED to be a plumber.
I do want to save $80 to $100 an hour so I'm doing it myself. How hard can it be anyway. I did replace the faucet on our current sink so I'm ALMOST an expert already.
I crawl under the new shiny sink and start to work hooking up the hot and cold water to the spout attachments and tighten everything up. I turn on the water main and it is gushing all over. I do more tightening and it is leak proof.
I untwist myself out from under the sink and start to attach the faucet handles when, in horror, I see I have hooked the whole thing up backwards. CRAP!!! I crawl back under - unhook EVERYTHING, crawl out, turn the dang thing around, crawl under, reattach everything, tighten everything up and proudly put on the handles correctly.!! YEA!!
Sounds easy but unless you are pretzel man it's a pain in the ass!
I turn the main water on, put a bowl under the spout (the drain pipes are not attached yet) and proudly turn on the water on full force.
An odd thing happens. I hear the water, but I do not see the water. Milo the cat is beside me (as always) and lets out a chirp in horror as he is closer to the water then I am. It is gushing out the middle hole where the sprayer is supposed to be attached. I KNEW there was something I was forgetting.
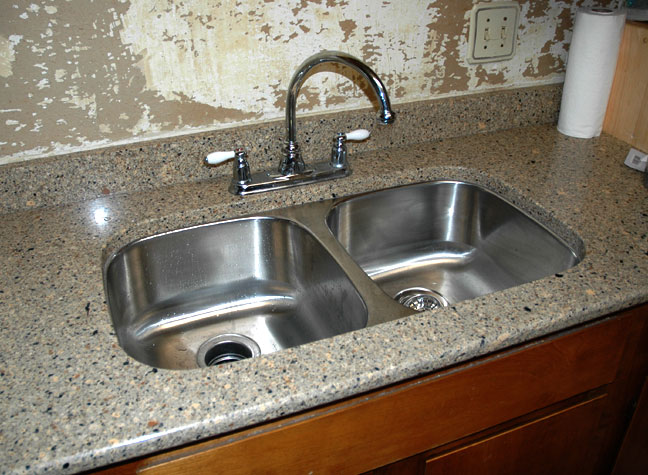 Wait, the sprayer? Hmmmmm There is no hole in the countertop for the sprayer!!!! I look, at the counter and quickly tell myself I like the clean look of the counter WITHOUT the sprayer.
So - every thing is all good.
I take a break before I start the drain pipes and installing the new garbage disposal.
Break meaning it's time to install a new thermostat. This seems easy enough. I take off the old thermostat, label the 4 wires, install the new casing, attach the wires to the correct screws, click everything in place, play with the digital settings, turn on the heat, . . . . .and nothing happens.
OK - the instructions say I need to wait 5 minutes, I'll start the drain pipes.
Before I move on let me say something about son-in-laws.
 If you ever have one and he is at a crossroads in life on which direction he wants to as far as profession goes, and he has a choice between a career path of becoming a police officer or one that would make him a home repair specialist - push him towards home repair.
I'm not going to go into detail on the exact problems we encountered while putting in the drain pipes but I will tell you some tips we learned.
Garbage disposals are 2 man jobs. Sure they CAN be done by one guy but they are pretty heavy and one lifting and one screwing them in is REALLY nice.
Another thing. In the photos you will notice we are replacing the steel pipes with PVC pipes. The reason is that PVC are more adoptable, you can saw them to correct length. With steel this is more of a problem.
Plumbing is a puzzle you have to put together and when you need a piece it is best to draw a picture BEFORE you go to Menards for the 2nd time and realize you do not know which side is male and which is female.
KNOW more then just the shape you need.
Also, make sure you have plumber putty AND if you are going the PVC route buy Pipe Thread Dope.
Pipe Thread Dope is what you put on the threads of PVC pipes, spread it thick BUT, it's not frosting so don't get carried away, and it's messy!
 Another thing to be aware of. When attaching metal to PVC. PVC will screw onto metal great!, HOWEVER, metal screwing onto PVC seemed to have problems with leakage. Try at all costs to replace to a point
Four hours later we actually accomplished the task. It was not as hard as it sounded but when you are working with odd shapes and unknown problems it takes a little longer then normal. It would take 1/2 the time if I had to (and I will) go through it again.
Of course WHILE we are doing this, daughter has noticed that a seal in the toilet leaks. This was unknown to us as Milo knocked down some little soap things and having just flushed the toilet she reached down to pick them up and got splashed!.
ANOTHER PROJECT!!!
 A NOTE from DJ.
Now that Rod has done his part struggling with the plumbing, its time for me to get busy and finish that darn wall! I did a google search and found instructions on how to repair damaged drywall. I came to the Zinsser web site. They give you detailed instructions on how to repair it, so I thought I would give it a try!
The first thing to do is sand everything down and make sure there are no pieces of drywall sticking up.
I bought a quart of the GARDZ high performance sealer-apparently this will seal the drywall and keep moisture out. You just put this on first with a brush or roller-seems easy enough!
Then I also need to buy some Ready Patch, which will supposedly fill in the gaps and make it smooth. Home Depot was out of the quart size and only had gallon containers. I don't think I need that much, so I'll go back in a couple days. Menards didn't have it-the guy was rude when I asked him about it. Anyway, I assume a person would have to have some type of skill to make sure this stuff goes on correctly.
This is the part that concerns me the most-whether I will be able to make this wall smooth again and not botch it up completely! We shall see. After you put the patch stuff on, you put on more of the sealer and you are done.
I also bought 2 quarts of Kilz 2 primer. I'm going to put this on the large portion of wall that wasn't damaged, but still has stains on it. In fact, I might just put it over everything to make it all uniform. When I'm done with that, I/we need to pick out some paint...I have no idea. I think I have a block now when it comes to color because I've looked at so many samples. I was thinking some sort of green before, but now that the counters are in, I'm not sure that will look right. I'm thinking either a sandy color or white now....
I will let you know how it goes...my plan is to finish the wall this
weekend.
So - there you have it - step one is complete. Counterstops are in and water is running.
BTW - the thermostat works fine. I had it on the wrong screen and once I programmed it to go back to the HOME screen the furnace clicked on. Piece of cake!!
Friday we are havign a Solatube installed into the kitchen (except we have a big snow storm coming) and also some blind guy is coming to talk to us. Not BLIND like can' see but blinds like curtains.Until then
DJ and Grinder OUT!
posted by Rod at 8:23 AM
![]()
![]()

1 Comments:
Ok, I'm confused. You decided to go without a sprayer at all? Don't you need one? I use mine all the time. It's great for hosing down a pesky cat from 15 feet away. :)
The counters look great, congrats.
Post a Comment
<< Home